

Invoice Preprocessing
The PDF preprocessor automates invoice renaming using OCR, entity matching, and batch file saving. Upload invoices, review extracted data, and save directly to the correct Accounting subfolder on the server.
Processing Invoices Workflow
-
Upload PDFs
Drag multiple PDF files into the upload box or click Browse files. -
Click Process PDFs
The system extracts data using OCR and matches against your databases. Give it time to load, processing multiple files takes a moment. -
Review Results
Each PDF shows a preview and extracted details, including the auto-resolved Path. -
Save Results
Click Save All to Server. Each invoice is filed under its resolved route folder, in amm-dd-yyyysubfolder.
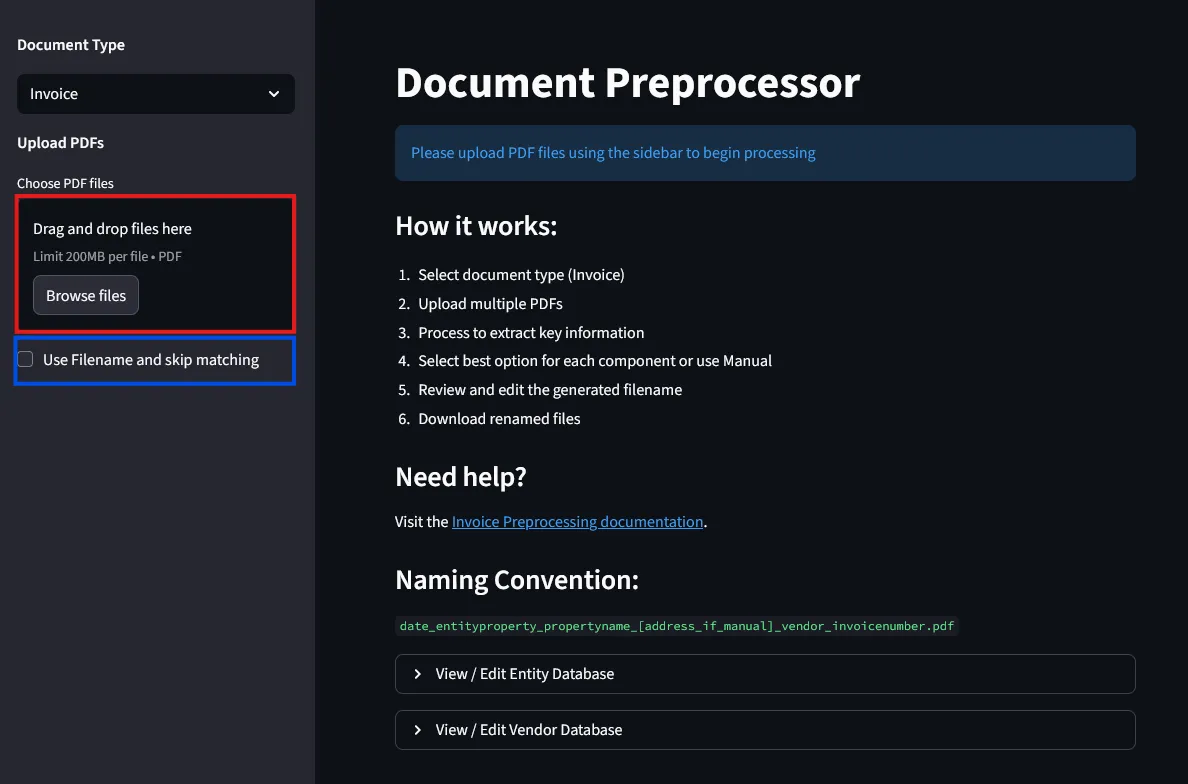
Updating the Vendor Database
In addition to the entity database, invoice processing uses a vendor database.
To update the vendor database:
- Click View / Edit Vendor Database dropdown
- The editor shows vendor names and matching patterns
- Click the + button (top right) to add a new entry
- Edit existing entries by clicking into the cells
- Click Save Vendor Database to save changes
Reviewing and Correcting Results
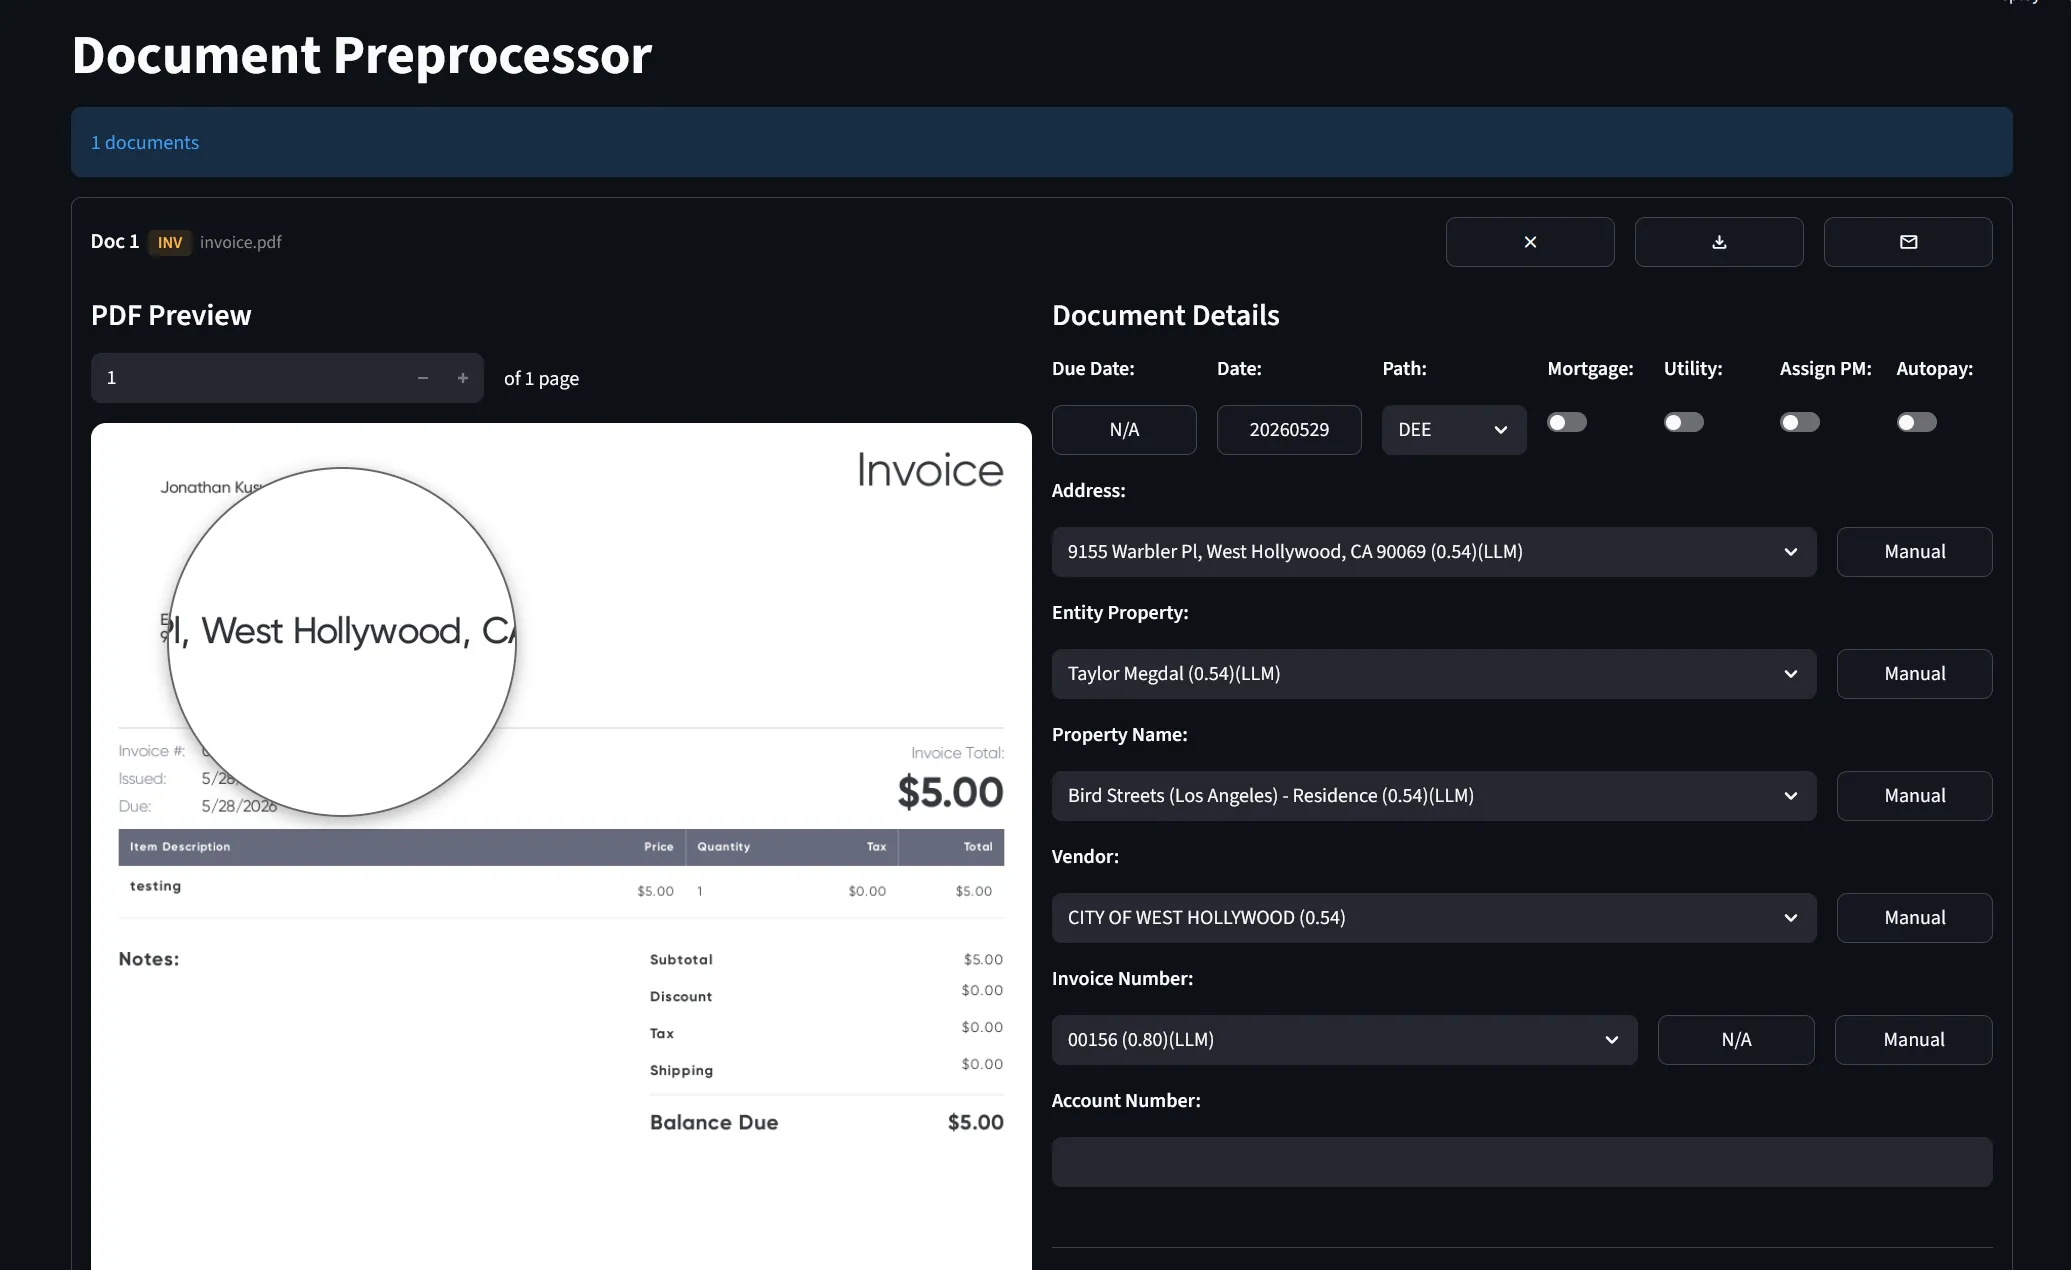
After processing, the dashboard displays the PDF preview on the left and extracted details on the right:
Fields Explained
- Due Date: Invoice due date extracted from the invoice
- Date: Extracted in
YYYYMMDDformat (today’s date if invoice date is unclear) - Path: Destination route under
Accounting\(e.g. REA, DEE, LOAN). Auto-resolved from the Invoice Path Database; override per invoice if needed - Mortgage: Toggle for mortgage-related invoices (auto-detected)
- Utility: Toggle for utility invoices (flags vendor as utility provider)
- Assign PM: Assigns the invoice to the property manager on Monday upload
- Autopay: Marks the invoice as paid via autopay
- Address: Property address extracted from the invoice
- Entity Property: Legal entity that owns or manages the property
- Property Name: Building or tenant name
- Vendor: Service provider or vendor name
- Invoice Number: Invoice ID from the document
Path Routing
The Path dropdown sets the destination folder for the invoice. The system auto-resolves it from the Invoice Path Database by matching the invoice’s entity, property, and vendor against the rules. Anything that doesn’t match a specific rule falls back to REA.
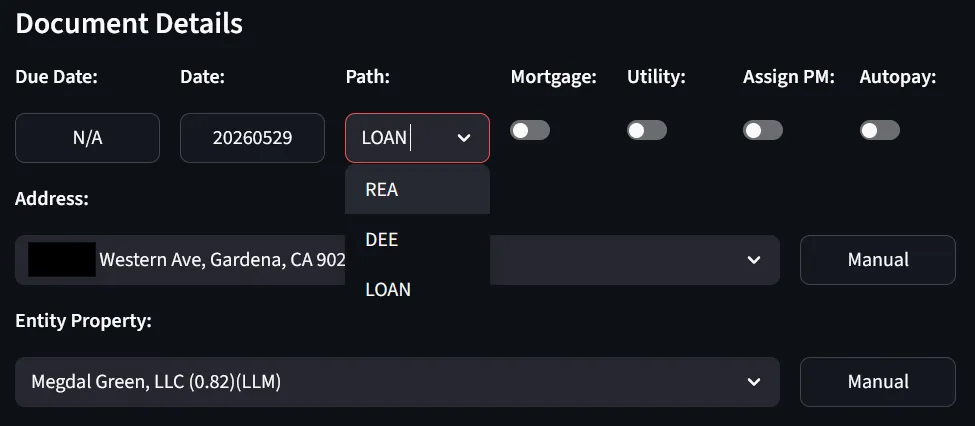
When to override:
- The auto-resolved route is wrong for this specific invoice
- A property/vendor combination isn’t in the database yet (use the override, then add a rule)
Mortgage Detection
The Mortgage toggle uses a two-step detection system:
-
Address + Vendor combo check: The system maintains a database of known mortgage combinations. When an invoice matches a saved address/vendor pair, it flags as a potential mortgage.
-
Keyword verification: The system scans the document for mortgage-related keywords (e.g., “mortgage”, “escrow”). Both checks must pass for auto-flagging.
When you manually enable the Mortgage toggle, the address/vendor combination saves to the mortgage database. Future invoices with that same combo will auto-flag as mortgage.
Utility Vendor Detection
The Utility toggle marks vendors as utility providers. When checked:
- The vendor saves to the vendor database with a utility flag
- Future invoices from that vendor auto-enable the Utility toggle
Using Dropdowns to Correct Data
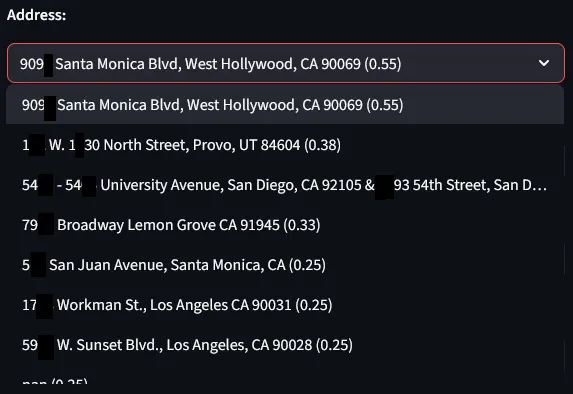
Each field shows a dropdown with the best matches. The confidence score appears in parentheses. e.g. (0.55) means 55% confidence.
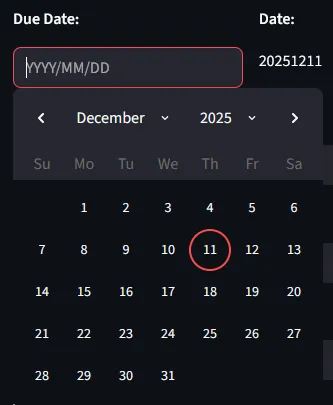
Due date matching:
Due dates are automatically extracted from the invoice using keywords. Click on the date box to change the extracted date. The calendar picker allows you to select the correct due date if the automatic extraction is incorrect.
Leave the field blank if the invoice has no due date.
Address matching:
The most efficient approach is to search by address. Begin typing in the address dropdown. The system will auto-populate Entity Property and Property Name when you select a match.
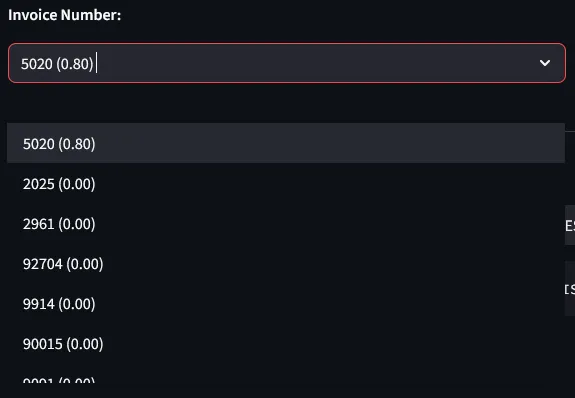
Invoice number matching:
If confidence is low, the invoice number field will be blank. If detected, it auto-selects the best match. If wrong, review other options in the dropdown:
Invoice-Specific Manual Overrides
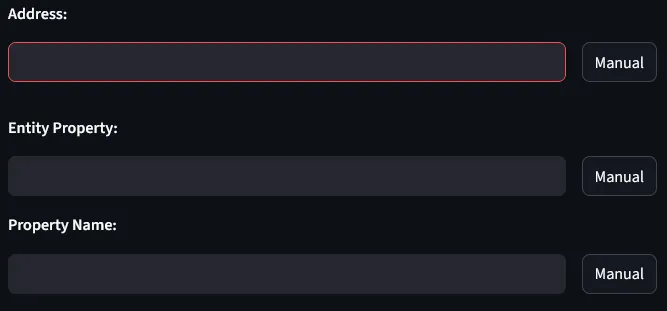
- Address manual override: Clears entity property and property name, using only the manually entered address.
- New vendor override: Manual vendor override automatically creates a new vendor entry in the vendor database.
- Generated filename override: The text box under Generated Filename can also be edited directly. Any edits here take precedence over all other fields.
Split PDF
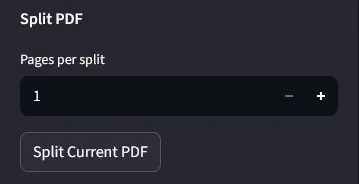
Split multi-page PDFs into separate documents for individual processing. This is useful when multiple invoices are combined in a single PDF file.
How to split:
- Enter the number of pages per split (e.g.,
2to split every 2 pages) - Click Split Current PDF
- The system creates new PDFs and processes each one automatically
Example: A 6-page PDF split every 2 pages creates:
- PDF 1: Pages 1-2
- PDF 2: Pages 3-4
- PDF 3: Pages 5-6
Saving Invoices
Invoices save to the Accounting folder on the server, routed by the Path value on each invoice and organized into dated subfolders.
-
Confirm the Path
Each invoice shows its resolved route in the Path dropdown. Adjust per invoice if needed. -
Click Save All to Server
Every invoice is written to its route folder underAccounting\, inside today’smm-dd-yyyysubfolder.
Save Location
Each invoice routes to Accounting\<path>\mm-dd-yyyy\, where <path> is the folder mapped to the selected route name. Examples:
Z:\Shared\BBT Asset Management Inc\Accounting\REA_Invoices\mm-dd-yyyy\Z:\Shared\BBT Asset Management Inc\Accounting\Personal_Invoices\mm-dd-yyyy\Z:\Shared\BBT Asset Management Inc\Accounting\Mortgage\mm-dd-yyyy\Invoice Path Database
The Invoice Path Database controls which folder each invoice is routed to. Each row maps a match rule to a destination folder.
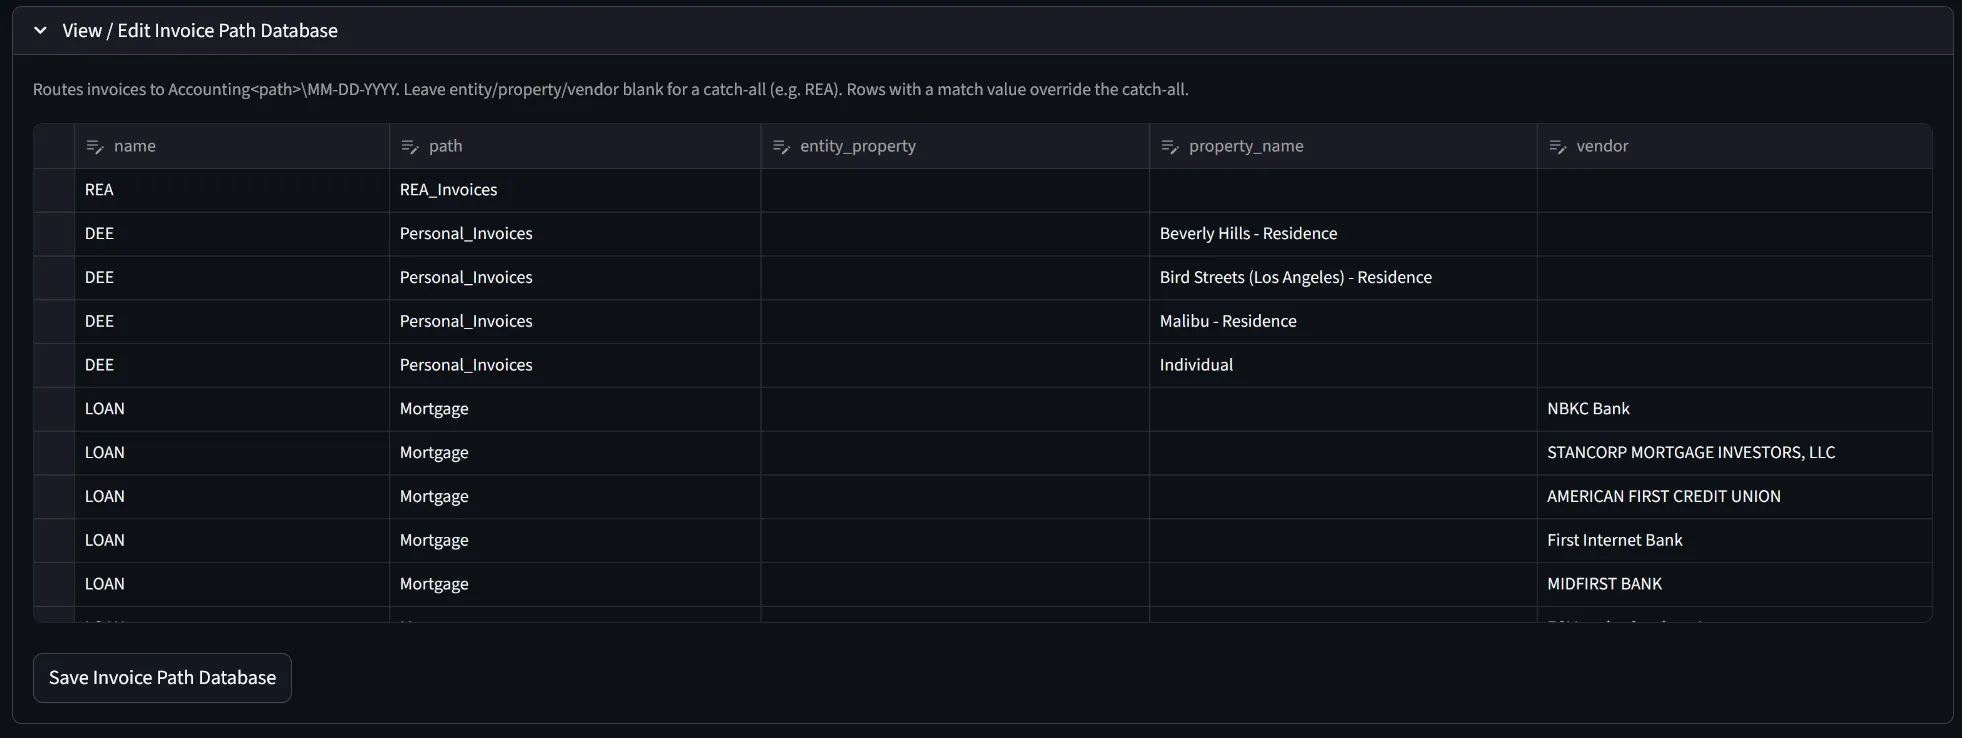
Columns
- name: Label shown in the Path dropdown (e.g.
REA,DEE,LOAN) - path: Destination folder under
Accounting\(e.g.REA_Invoices,Personal_Invoices,Mortgage) - entity_property: Optional entity match
- property_name: Optional property name match
- vendor: Optional vendor name match
How Matching Works
The system reads each invoice and looks for a row that fits it.
A row fits an invoice when every match column you’ve filled in lines up with that invoice. Blank match columns mean “doesn’t matter.” Capital letters don’t matter either.
Order of priority:
- Specific rows are checked first — any row with at least one match column (entity_property, property_name, or vendor) filled in.
- The first specific row that matches wins.
- If nothing specific matches, the catch-all row (the one with all match columns blank) is used. This is usually REA.
Examples
Three common patterns cover most situations:
Send everything to REA by default
Add one row to act as the fallback. Fill in just the name and path:
- name:
REA - path:
REA_Invoices - Leave entity_property, property_name, and vendor empty
Any invoice that doesn’t match another row will end up here.
Send specific properties to a different folder
To route personal residences to Personal_Invoices, add one row for each residence. Use the same name (DEE) on all of them so they appear as a single option in the Path dropdown:
- name:
DEE - path:
Personal_Invoices - property_name:
Beverly Hills - Residence - Leave entity_property and vendor empty
Repeat the row with Malibu - Residence, Bird Streets (Los Angeles) - Residence, and any other residence you want routed to Personal_Invoices.
Send specific vendors to a different folder
To route mortgage payments to Mortgage, add one row per lender. Use the same name (LOAN) for all of them:
- name:
LOAN - path:
Mortgage - vendor:
NBKC Bank - Leave entity_property and property_name empty
Repeat for each lender — STANCORP MORTGAGE INVESTORS LLC, MIDFIRST BANK, AMERICAN FIRST CREDIT UNION, etc. Type the vendor name exactly as it appears in the vendor database.
Editing the Database
-
Open the editor
Click View / Edit Invoice Path Database on either the Automatic or Invoice home screen. -
Add or edit rows
Click the + button to add a new row, or click into any cell to edit. Leave match columns blank for catch-all rules. -
Save
Click Save Invoice Path Database. Changes apply immediately to all in-progress invoices.